
Tiger bends the shaft --
but that much?!?Over the past few years, the camera has become an integral part of golf instrumentation. We find them in launch monitors, feedback systems for swing training, and shaft behavior recorders (for instance, see the Fujikura Enso). Digital cameras have the advantage of cost, integration with computers (to number-crunch the photographic data), no moving parts and the inherent speed of electronics. So you can trust the camera readings. Right? Not necessarily.
Photographic studies of shaft bend may be influenced by distortion in the photos themselves. In particular, shaft bend itself is often exaggerated in photos due to the way digital cameras and camcorders scan their pixels. But this is not new. Film cameras with focal plane shutters do the same thing, and that distortion has been known for a century.
In this article, we will:
- Explain how and why the distortion happens, using the focal plane shutter.
- Show how this distortion shows up as exaggerated shaft bend.
- Show why the digital camera, with no moving parts, suffers the same problem.
- Show how to take pictures of shafts that minimize bend distortion.
- Give a few examples of low-distortion pictures, along with their distorted counterparts.
Focal Plane Shutters Distort Moving Objects
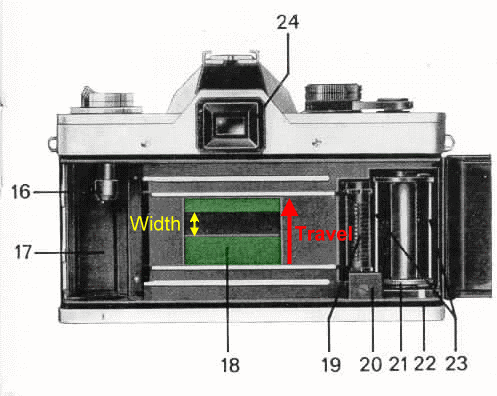
An SLR camera with the back open. #18 is the focal-plane shutter.Single-lens reflex cameras were the basic tool of photojournalists and action photographers for the last half of the 20th century. And an essential part of the SLR was the focal-plane shutter. Unlike the older leaf shutter, which sat just behind the lens (or even between elements of the lens) the SLR's shutter was a pair of curtains that covered the film, then briefly exposed it, then covered it again. It is called "focal plane" because it is almost against the film, the plane in which the image is in focus.
The picture at the left shows how a focal-plane shutter works. The green-shaded rectangles are a pair of metal curtains, with an opening between them. Before the picture is snapped, the upper curtain obscures the film; that is, it lies fully across the large rectangular opening, preventing any light from reaching the film. When you snap the picture, this upper curtain starts traveling upwards, exposing the film as its lower edge ascends.
Moments after the upper curtain exposes the film, the lower curtain follows it up, once again covering the film. So the shutter works by exposing the film between the upper curtain withdrawing and the lower curtain advancing. The "speed" of the shutter -- the time it is open and exposing the film -- is proportional to the width of the opening between the curtains (the yellow dimension in the picture) divided by the speed of travel of the two curtains.
Focal plane shutters control the exposure by setting the width of the opening. Then a precise mechanism drags both curtains at the same precise speed, so the width of the opening completely determines how long the film is exposed to light.1 It works really well. Just one hitch. Not all parts of the image are exposed at the same time.
True, all parts of the image are exposed for the same amount of time. But the bottom of the film is exposed before the top is. That is fine, as long as the subject is stationary or moving slowly. 'Slowly' is not too literal. The difference between bottom exposure and top exposure is seldom much more than 1/50 of a second. But in sports photography in general -- and golf instumentation in particular -- 1/50 of a second, or 20 milliseconds, is a significant interval. And, as we shall see, it can make a big difference.

Car Trip -- Papa at 80 kilometers an hour
Jacques-Henri Lartigue, 1913
Let's try some numbers here. Suppose I set my focal-plane shutter to take a picture at 1/1000 of a second. (That's 1 millisecond.) My camera moves the curtains so they cover the whole frame in 20msec. So the mechanism sets the width of the slit between the curtains to 1/20 of the whole frame height, then lets the two curtains move in sync. Each grain of film is exposed for 1/20 of 20msec, or one millisecond. Exactly correct! But the bottom of the film "sees" its portion of the image 20msec earlier than the top portion does.
This effect -- and the distortion it can cause -- was not freshly discovered in 2010 with digital camcorders making distorted frames of shaft bending. It was well-known as soon as focal-plane shutters were used for action photos. For instance, look at this picture of a speeding automobile taken almost 100 years ago. The camera was "panning" with the moving car, at a speed between the speed of the car and the stationary spectators in the background. Remember, it was exposed with a sliding slit. The top of the picture was exposed milliseconds after the bottom. So the car appears tilted to the right, and the stationary items appear tilted to the left. That is an obvious result of the top being exposed measurably after the bottom.
If you want to see how a focal-plane shutter works in full-motion video, Gavin Free of The Slo Mo Guys has done such a video. Worth watching, a lot of fun.
This Distortion Exaggerates Shaft Bend
 If you apply the same technology to a releasing golf shaft, the result
is a distortion-induced shaft bend. The diagram at the right shows how
it happens. Here are the words to go with the picture:
If you apply the same technology to a releasing golf shaft, the result
is a distortion-induced shaft bend. The diagram at the right shows how
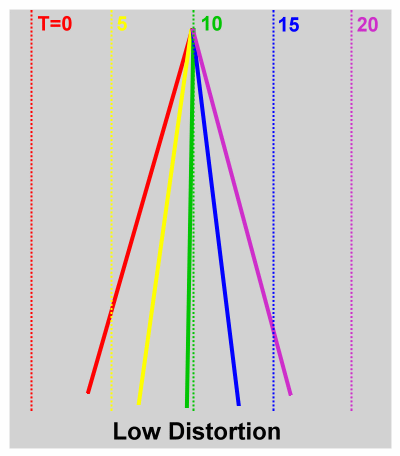
it happens. Here are the words to go with the picture:- We have a camera whose focal-plane shutter takes 20msec to go from the top of the shaft to the bottom.2
- We have a perfectly straight shaft near its top speed. It is turning about 2º per millisecond, or 40º over the duration of the shutter movement. Once again, the shaft is not bent at any point in this scenario.
- The horizontal dotted lines are the position of the shutter opening at 0 milliseconds, 5msec, 10msec, 15msec, and 20msec. The shaft position at each of these times is given by the corresponding-color solid line.
- I have put a circle at the intersection of the corresponding-color lines. The circle is the position of the shaft seen by the film at the moment the slit focuses on it. If you connect these circles by a smooth curve, you will see all the fractional images of the shaft that the film sees.
- I have "connected the dots" in exactly that way. The fat gray curve is the image of the shaft captured on film.
The point is that the image on the film shows a very curved shaft, but we know that the shaft was perfectly straight throughout this exercise. The apparent shaft bend is completely an artifact of the way the focal plane shutter exposes the film.
Digital to the Rescue -- Not
Well, maybe we shouldn't, but we do. The reason is in the numbers.
The picture to the left is formed as a collection of pixels, picture elements. Every digital picture is made up of individual pixels. The smaller and the more the pixels, the sharper the picture. We call that "resolution". And of course you knew that. So let's get back to the way the camera works.
The camera's "retina" is an array of photosensors, one per pixel. At the moment of snapping the picture, all those photosensors are sampled at once. Well, not exactly. The picture here is made up of a 40x40 array of pixels, for a total of 1600 pixels. If the camera had enough electronics to sample 1600 pixels simultaneously, it would be bigger and more expensive than the digital cameras we are used to. Instead, the camera electronics scans the pixels, sampling them one at a time (or perhaps a few at a time).
That means it takes some time to for the photosensor to gather the entire picture. Suppose we can sample one pixel per microsecond; that's a million pixels per second. So we can completely scan this picture in 1.6 milliseconds. That's fast. No problem scanning at all. We just start at the upper right of the picture (pixel 1), scan across the row (to pixel 40), then start on the next row (starting at pixel 41 and sweeping across to pixel 80). Eventually -- less than 2msec later -- we have scanned pixel 1600 and the entire picture is saved.
But wait! 1600 pixels is 0.016 megapixels. The cameras you buy today typically have 10 megapixels and more. If you scan 10 megapixels at one per microsecond, it will take ten seconds to save the whole picture. Think of the distortion that could build up in ten seconds. Obviously, digital cameras do better than that.
As it turns out, fast photosensors and multi-pixel scanners reduce this time. In the typical digital camera, it winds up at about the same 20msec that a mechanical focal-plane shutter takes. (Not coincidence; the digital designers needed to compete with top-of-the-line film SLRs. They didn't need to far exceed them, so they spent what was necessary to compete.) And they scan row by row, as in the picture above. The numbers that result from this are:
- A 10 megapixel photosensor has about 2800 rows of 3600 pixels each.
- If the array is scanned in 20msec, then each row takes 7 microseconds.
That is exactly what we saw with a focal plane shutter! The row being scanned corresponds to the slit between the curtains, and the row-by-row scan corresponds to the motion of the slit across the frame of the film. The distortion is going to be exactly the same as it was with the focal plane shutter. Digital cameras have not rescued us from that.
How to minimize distortion
How do we minimize this distortion? The obvious answer is to scan faster. Grab all the pixels quickly, so the shaft does not have a chance to move very far during the scan. This can certainly be done. For instance, we could get a high-frame-rate camera. A video camera that runs at 1200 frames per second has less than a millisecond to record an entire image. So we know it will scan fast enough to keep distortion very low. Such cameras exist, but are much more expensive that what you are likely to have on hand. If you can spend enough money on instrumentation, then the solution is out there.4
But can it be done with conventional cameras? Rick Malm has suggested a way to minimize distortion in pictures taken with conventional digital cameras and camcorders. Well, it's not the first time I've heard the suggestion. But Rick is the first guy I've seen to actually go out and do something about it. He has used his Casio EX-F1 camera to demonstrate the technique.
Rick (and many others) observed that a horizontal shaft is not distorted much. That is because it is parallel to the scanning rows of pixels. So the scan catches and passes the shaft in just a few rows -- a very short time. There isn't much chance for the shaft to move during that time. Since the distortion is due to an object moving while it is being scanned, we can minimize distortion by scanning more or less parallel to the shaft.
For example, look at the picture on the right. This is analogous to the picture above, but with the scan lines nearly parallel to the shaft at T=10msec. So the only scan lines that actually intersect the shaft are those just around 10msec. (Remember that the shaft positions and scan lines are color-coded; intersection only counts for like colors. So the only intersection is just before the green positions.) In other words, the duration of actual views of the shaft is right around a millisecond, instead of 20 milliseconds. The shaft only has a fraction of the movement during exposure, and there is far less opportunity for distortion.
Unfortunately, our cameras are what they are. Not many of us are in a position to modify the scan of our digital cameras. I have two degrees in electronics engineering, and I wouldn't dream of attempting it on an existing camera that I own.
But there is a simple, pragmatic way to do it. We can tilt the camera, so it is scanning parallel to the shaft at the shaft position of interest. (If you need to measure shaft bend throughout the swing, you will need the expensive, higher-speed camera.)
Of particular interest is the case of the vertical shaft. One of the most interesting and contentious details of shaft bend is the bend just before impact, where the shaft is essentially vertical. A few of the more important things we get from bend in the vertical shaft are:
- The loft added to that built into the head. We all know that shaft bend changes the loft at impact.
- Whether the hands are accelerating or decelerating the clubhead at impact. If the shaft is bent forward (clubhead leading the grip) more than about ½", then the hands cannot be providing any clubhead acceleration. And almost every good swing does meet this criterion. (See my article on ShaftLab for why this is, and the article on hitting with the hands for why it matters.)
Examples
Rick has shared with me several pairs of pictures that he took to demonstrate this. In each pair, one picture is taken normally, and shows distortion that exaggerates the bend of the shaft. The other is taken with the camera tilted 90º, so the shaft is roughly parallel to the scan rows -- and, as a result, is not distorted. Rick and I have added red lines to the pictures, as a reference for where an absolutely straight shaft would be.In each of the picture pairs below, the left picture is taken normally and the right picture with the camera vertical. Click on the sample pictures to see the full-size raw picture as Rick sent it to me.
 Let's
start with an example that is identical with the diagram we used above
to explain the distortion. Here Rick is swinging a section of aluminum
tubing. It is fat and very rigid; it does not bend at all. (Well, not
enough to see, anyway.)
Let's
start with an example that is identical with the diagram we used above
to explain the distortion. Here Rick is swinging a section of aluminum
tubing. It is fat and very rigid; it does not bend at all. (Well, not
enough to see, anyway.)There is a lot of bend evident in the first picture. But it is all illusion, due to the distortion. The actual bend, seen in the second picture, is invisible.
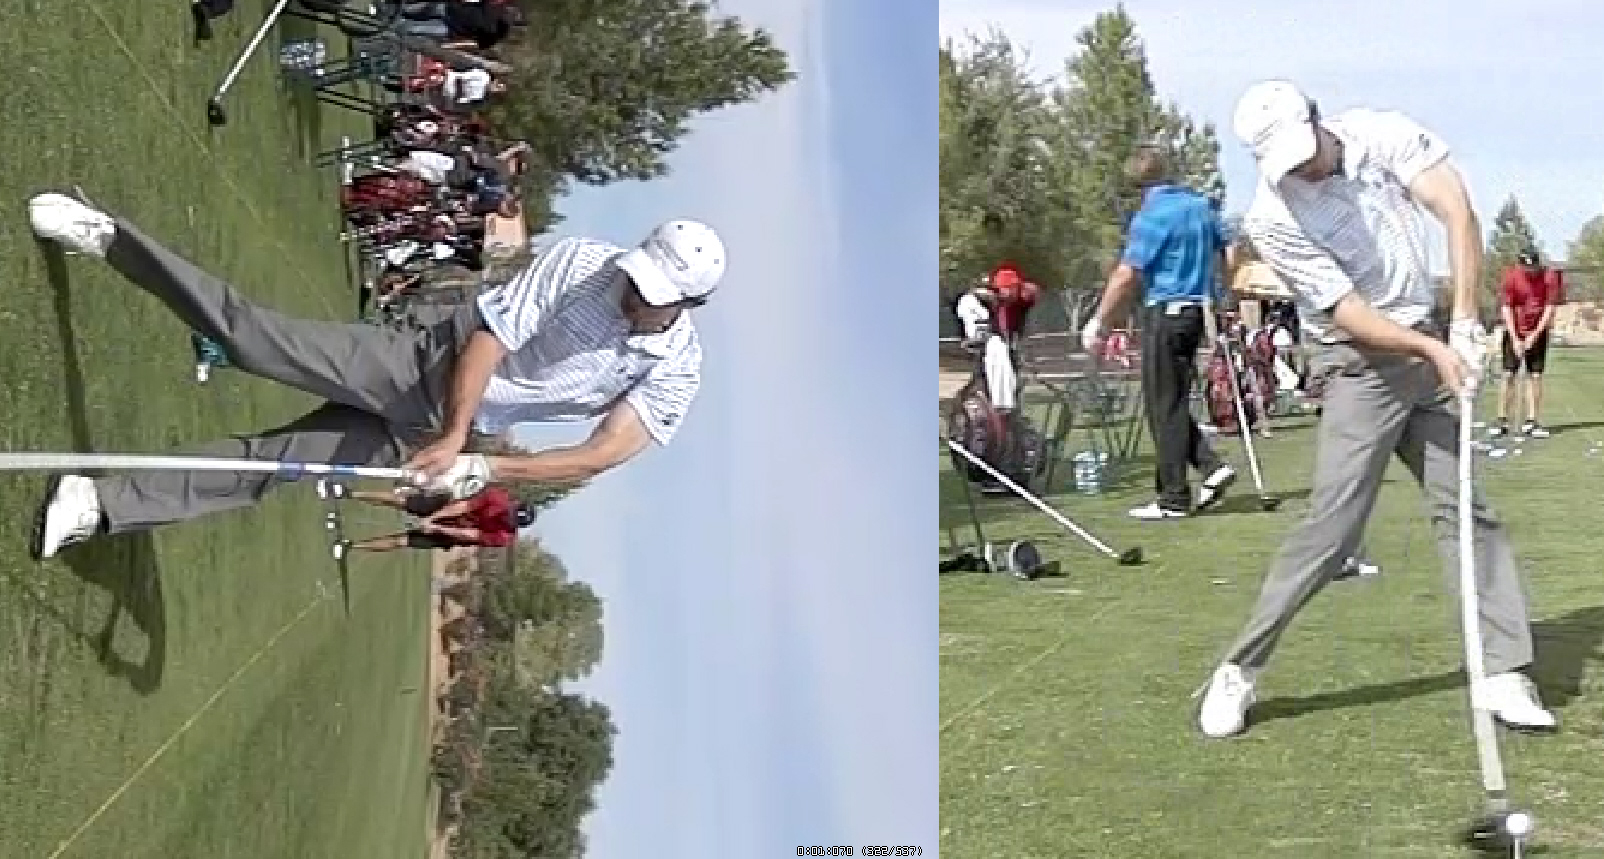 Rick
attended the 2009 Long Drive World Championships in Mesquite, NV. At
the practice range, he had an opportunity to photograph Jamie
Sadlowski, the world champion. This pair of pictures shows that, while
Jamie's shaft is certainly bent forward at impact, it is not by nearly
as much as a conventional photo would show. (The left picture is taken
normally, the right picture with the scan lines vertical.)
Rick
attended the 2009 Long Drive World Championships in Mesquite, NV. At
the practice range, he had an opportunity to photograph Jamie
Sadlowski, the world champion. This pair of pictures shows that, while
Jamie's shaft is certainly bent forward at impact, it is not by nearly
as much as a conventional photo would show. (The left picture is taken
normally, the right picture with the scan lines vertical.)This picture pair and the next (the one of Dewald Gouws) are frames taken from video, which was shot at 300 frames per second. Instead of a total scan time in the order of 10-20 milliseconds -- as with a conventional camera or camcorder -- it is only 2-3 milliseconds.
Therefore, even the distorted picture does not exaggerate the bend as much as a conventional photo. Even so, the bend in the first picture is substantial -- and an exaggeration, as the second picture tells us.
 The
same is true for long-driver Dewald Gouws, who came in second to Jamie.
His shaft is also bent forward just before impact, but a lot less than
the photo on the left suggests. The picture on the right is
distortion-free.
The
same is true for long-driver Dewald Gouws, who came in second to Jamie.
His shaft is also bent forward just before impact, but a lot less than
the photo on the left suggests. The picture on the right is
distortion-free.Some folks may be surprised that the shafts do actually bend forward coming into impact, even for these big hitters. But experienced clubfitters and golf engineers are not surprised at all. They might even wonder at how small the forward bend is. But remember, these guys use much stiffer shafts than you or I would. While the bending forces might be a lot larger than the average golfer, the XXX-flex shaft resists that bend fairly effectively.