Do-it-yourself Digital Swingweight Scale
Using the scale
Dave
Tutelman -- May 9, 2015
Measuring swingweight
If you are familiar with conventional (non-digital, sliding weight)
swingweight scales, this should be pretty familiar in operation.
You
place the club in it as you would any swingweight scale. The difference
is that you read the swingweight on a digital display, instead of
balancing the arm with a sliding weight.
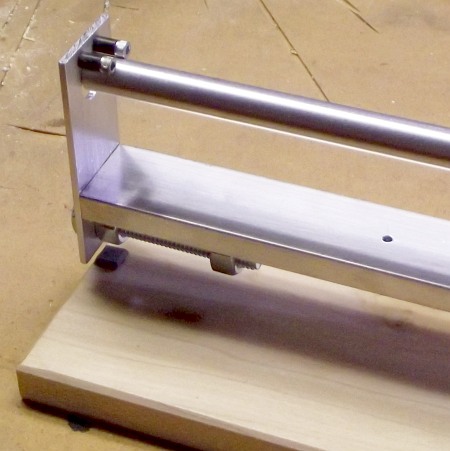
For
normal operation, the gram scale's meauring tray should be centered
under the forward round-head machine screw. When the club is placed on
the instrument, that screw applies a force to the gram scale.
Reading swingweight
 The display
is a digital gram scale. The scale in the picture reads to a tenth of a
gram, but the last digit is wasted. You will use the reading to the
nearest gram. The display
is a digital gram scale. The scale in the picture reads to a tenth of a
gram, but the last digit is wasted. You will use the reading to the
nearest gram.
There should be no club in the swingweight scale when you press the
"on" button of the gram scale. We want the zero reading to be a true
zero. But if you happen to forget, and turn on the gram scale with
weight on it, just remove the weight and press the button labeled
"tare" or "zero"; every digital gram scale has such a button.
The display does not give a lorythmic swingweight like "D-1"
directly, but reading it is very easy once you do it a few times. The
output is in grams, and a swingweight point is exactly ten grams. Zero
grams is a swingweight of A-0.
So here is a table of the usual swingweights.
| Swingweight |
Grams |
| A-0 |
000 |
| B-0 |
100 |
| C-0 |
200 |
| D-0 |
300 |
| E-0 |
400 |
| F-0 |
500 |
Example:
the reading in the picture, 352.0 grams, corresponds to a swingweight
of D-5.2.
That is:
- The first digit, 3,
means we are in the D
range.
- The rest of the digits, 52,
means we are 5.2
points into the D
range.
In my experience, this instrument is precise to about a fifth of a
swingweight point, or 0.2 points. It may give a resolution higher than
that, but the reading is not repeatable to better than 2 grams on the
scale. Therefore, the extra
resolution does not show up as precision.
The precision
cannot be improved by a more precise gram scale; the problem is not
measurement of force, but the measurement of swingweight itself. First
Walter, then I, discovered that on every variation of every model we
made. Here
are some of the factors that may limit precision, and there may be more:
- The
ball bearings that make up the fulcrum of the swingweight scale are
very low friction. But they are not zero friction. The small residual
friction may be providing small amounts of force that would otherwise
be provided (and measured) by the gram scale. In fact, Walter and I
tried various kinds of bearings -- two kinds of ball bearings and a
polyethylene sleeve bearing -- with no better results.
- The shaft is not
perfectly rigid. It vibrates. There are small vibrations that have a
tiny -- but measurable -- effect on the instantaneous force on the gram
scale. (I would not have even thought of this one, but Alex Dee of
Fujikura Shafts, who is himself working on an advanced digital swingweight scale,
told me they encountered this problem. Their digital filters limit the
effect of vibration, but it still prevents the precision from being
much better than a quarter point of swingweight. That number is close
to the 0.2 points I have observed.)
|
Placing the club on
the scale
Place the club on the scale, then wait briefly for the scale to settle
before you take the reading.
Don't drop or push the club onto the scale. Place
it relatively gently. A thumping drop establishes a too-high
initial force. The result can be a slower response of the gram scale,
and perhaps even a too-high force once it settles. You don't have to be
very delicate, but you must not be abrupt nor rough.
 Measuring a completed club: Measuring a completed club:
Place the butt of the grip against the butt stop, under the two pins.
It is now positioned correctly, and hooked in so it can exert force on
the arm of the instrument. |
 Measuring without a grip: Measuring without a grip:
Much like the completed club. Place the butt of the shaft against the
butt stop, under the two pins.
It is now positioned correctly, and hooked in so it can exert force on
the arm of the instrument.
The position of the pins has been chosen so that they support the club
in a good, measurable position with or without the grip. |
 Virtual butt-trimming for
swingweight: Virtual butt-trimming for
swingweight:
Few people do this, because few swingweight scales are set up to
facilitate it. I had modified my traditional scale to do it, and
designed this one to make it easy.
The point of this is to measure what the swingweight would be if the
club were shorter due to butt-trimming. You can position the club with a "virtual butt
trim", and slide it around until it reads what you want. You now trim
at the inner face of the butt stop.
To position the club, slide the gripless shaft through the large hole
in the butt stop. You can now virtually trim quite a few inches from
the club, just by sliding it further through the hole.
This does not give a completely accurate swingweight, because the shaft
sticking out beyond the butt stop has a little weight. Every gram of
shaft weight beyond the butt stop subtracts
rough a third of a swingweight point.
So you have to add
that swingweight back to the reading to get the swingweight of the
trimmed club. There's a table below in a math notes box, so you can see
what the numbers look like.
But it's actually much easier than that.
You really don't need to use any rules of thumb or do any math if
you're using a cutoff saw to butt-trim the shaft. You just have to be
willing to make two cuts. (Maybe three for steel shafts.) Here's how to
do it:
- Slide the shaft in the hole until you measure the target (gripless) swingweight.
- Mark the shaft using the inner edge of the hole as a marking guide.
- Cut off the end of the shaft at the mark. (Be sure to allow for the thickness of the marker if it was not very
sharp.) You will not have cut off too much, because the end hanging
through the hole assures that the swingweight will be higher than
measured once you have cut it. So it may still be a little long, but
definitely not too short.
- Measure the cut club normally, with
the shaft against the butt plate and under the pins. If it is within
the instrument's tolerance (say about 0.2 swingweight points), you are
done. Otherwise, the swingweight will be higher than the target
swingweight. Go back to step #1 and repeat the steps.
With
graphite shafts, it has not taken me more than two cuts -- two passes
through the steps. Much easier than calculating using the table below.
Even with steel shafts, it should not take more than three cuts, and
very possibly two.
|
| Shaft
material |
Shaft
weight (grams) |
Shaft length
(inches) |
Grams
per
inch |
Add this
swingweight to get true effect of trimming.
Shaft extends... |
| 1 inch |
2 inches |
3 inches |
4 inches |
5 inches |
6 inches |
| Steel |
120 |
40 |
3.00 |
0.9 |
1.8 |
2.8 |
3.8 |
5.0 |
6.1 |
| Lightweight
steel |
100 |
40 |
2.50 |
0.7 |
1.5 |
2.3 |
3.2 |
4.1 |
5.1 |
| Medium
graphite |
80 |
41 |
1.95 |
0.6 |
1.2 |
1.8 |
2.5 |
3.2 |
4.0 |
| Lightweight
graphite |
60 |
46 |
1.30 |
0.4 |
0.8 |
1.2 |
1.7 |
2.2 |
2.7 |
If you're looking for a rough rule of thumb, add one swingweight point per inch for steel shafts, and half of that for lightweight graphite.
|
Calibration
Calibration is rather simple. With no shaft loaded in the
instrument, move the gram scale so it is centered under the rear
round-head machine screw, and adjust the counterweight until you get a
reading of 500 grams on the gram scale.
The counterweight is a ½ inch hex bolt, plus whatever nuts and washers
you choose to add for weight. Do what you need to do to get the scale
to read 500 grams. At that point, your swingweight scale is calibrated.
Here are some hints about how certain components affect the reading:
- A hex nut added to the middle of the ½ inch bolt will increase the reading by about 22 grams.
- Screwing or unscrewing the hex nut the length of the ½ inch bolt will change the reading by about 4 grams.
- The hex bolt itself can be either 2½ or 3 inches long. The difference will change the reading by about 12 grams.
- Washers or lockwashers added to the ½ inch bolt are lighter than a hex nut, and will have proportionally less effect.
- A
nylon-insert locking nut is slightly heavier than a hex nut, and can be
counted on to stay securely where you put it. I have not found a
locking nut necessary in my shop, but you might want one if you travel
with your swingweight scale; otherwise, vibration in transit may throw
off the calibration.
For
reference purposes, being off by 1 gram on the calibration introduces
an error of about 0.2 swingweight points, roughly the precision of the
instrument itself.
Last modified - Sept 17, 2015
|


